
Forum rules
Oekaki posts must follow our Rules for the Site and Forum,
including the Oekaki Rules and Art Rules.
Having trouble using oekaki? Check out the Oekaki Guide or send in a help ticket.
Oekaki posts must follow our Rules for the Site and Forum,
including the Oekaki Rules and Art Rules.
Having trouble using oekaki? Check out the Oekaki Guide or send in a help ticket.
oekaki guide (chickenpaint v2 guide) by castiiian

| Artist | castiiian [gallery] |
| Time spent | 7 hours, 4 minutes |
| Drawing sessions | 3 |
| 153 people like this | Log in to vote for this drawing |
29 posts
• Page 1 of 3 • 1, 2, 3
oekaki guide (chickenpaint v2 guide)
![]() by castiiian » Sun Nov 20, 2022 11:59 am
by castiiian » Sun Nov 20, 2022 11:59 am
- oekaki forums breakdown
- learn how to use the oekaki forums!
- chickenpaint v2 breakdown
- learn how to use oekaki chickenpaint v2!
- fundamentals
- the most important tips for using oekaki!
- techniques
- some fun techniques or brushes to try!
- frequently asked questions
- might answer some of your questions!
- art tutorials
- browse user-made oekaki tutorials!
- chickensmoothie's code of conduct
- this gives you a rundown of what you can and can't draw; a good rule of thumb is to keep your content child-friendly!
and if you have to ask if it is or isn't safe to post... it probably isn't okay. if you aren't sure if your artwork is safe for cs, send in a help ticket to get a mod's advice! - oekaki rules
- here are the general rules of oekaki; the most commonly broken rule is...
your artwork should show intention and effort, we don't allow random scribbles, blank canvases, simple shapes
"cover" artworks break this rule the most; here's a quick visual cover guide! - oekaki art competition rules
- tldr, the most commonly broken rules are...
oekaki art competitions must either provide a line art or a proper background
additionally, if the prize is a pet, you must individually link to each pet's page - original guide (made in 2011/updated throughout 2014)
- chickensmoothie oekaki wiki
- this guide provides a super in-depth break down of oekaki; but some parts might be a little outdated!
- oekaki frequently asked questions
- this frequently asked questions sheet might answer some of your basic questions!
- oekaki/java problems and solutions
- have a problem with oekaki? check out this thread for some help! if your problem isn't solved by the thread, chances are you've encountered a bug, and you should check out the help forums!
- oekaki settings page
- switch between the different versions of oekaki here! please note that "chibipaint" requires java; java support has been discontinued by many modern browsers! i suggest you use "chickenpaint 2.0", as it's the most updated version, and should give you the least amount of trouble!
- welcome to the oekaki guide!!
if you have any questions, feel free to to post them here or reach out to staff via a help ticket!
everyone is welcome to chip in with techniques or answer questions!!
let's support our fellow artists and share our knowledge! >:3c
what's this guide for?
- this thread breaks down oekaki, chickenpaint, the fundamentals and some techniques!
it's also a space for users to ask questions and share techniques and tips!
this thread is big, so if you have a specific question, i recommend hitting ctrl f and searching a keyword!
if you have any further questions or need any help, send in a help ticket to get a response from a mod!
NOTE: this is an image heavy guide! please be patient letting it load on slower devices/internet!
thread index:
super mega important: (must reads!)
important links: (these are all off thread!)
-

castiiian - Oekaki Moderator
- Posts: 5803
- Joined: Mon Apr 11, 2011 9:52 am
- My pets
- My items
- My wishlist
- My gallery
- My scenes
- My dressups
- Trade with me
oekaki forums breakdown
![]() by castiiian » Sun Nov 20, 2022 11:59 am
by castiiian » Sun Nov 20, 2022 11:59 am
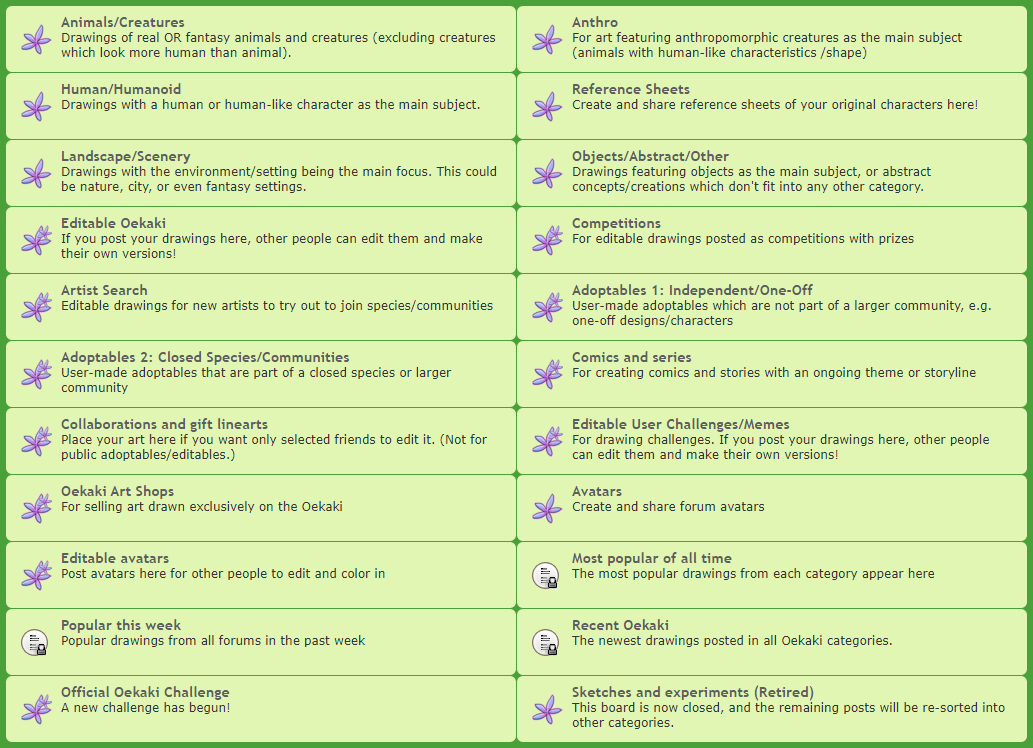
all oekakis made on chickensmoothie are organized into one of the above topics!
topics that have two flowers as their icon have a second topic stored within the main one,
for example, the topic 'adoptables 1: independent/one-off' has another topic inside called 'adoptables 1: pets'
please note that the forum colors and icons will be different depending on your forum style/appearance!
ps. you can change the appearance of your forums in the "my board style" dropdown, here!
which is the correct board to post my drawing?/what are all the boards on oekaki?
click on any topic to enter that area, and then from there, you can create a new drawing!
this "new drawing" button is also how you find oekakis you saved and wanted to finish later.
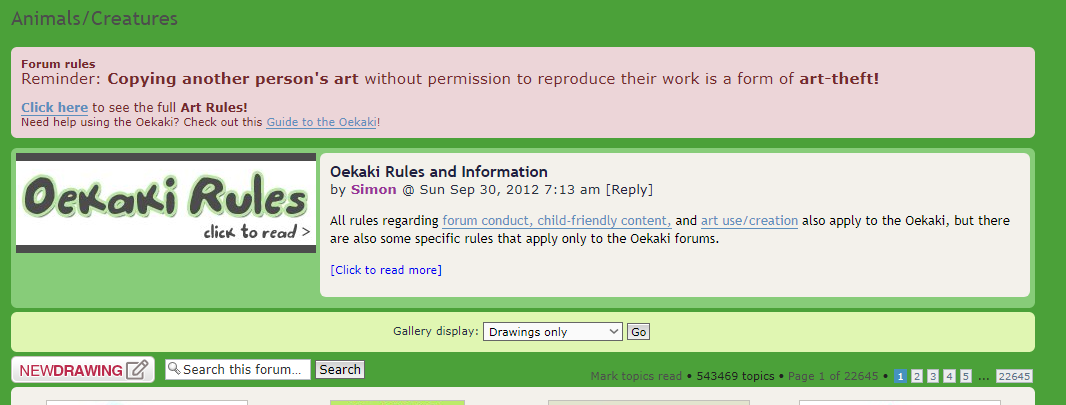
this "new drawing" button is underneath the title, forum rules notice, and oekaki rules post!
when you click on this button, you're brought to this page next...
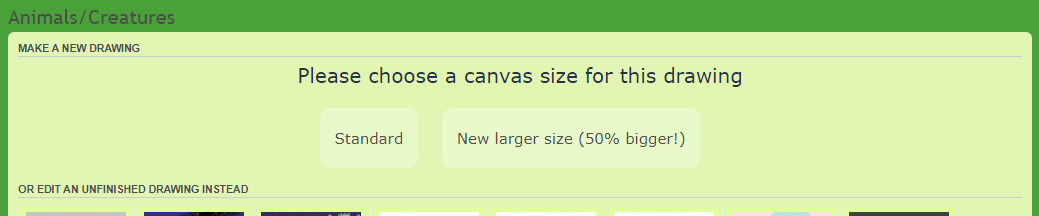
from here, you can select your canvas size, and make a new drawing!
if you have any unfinished oekakis, you can scroll down (before clicking a canvas size) to instead load one of those!
ps. did you know that there's different sized canvases on oekaki?
underneath any opened workspace, you'll find a small area of settings and other information...
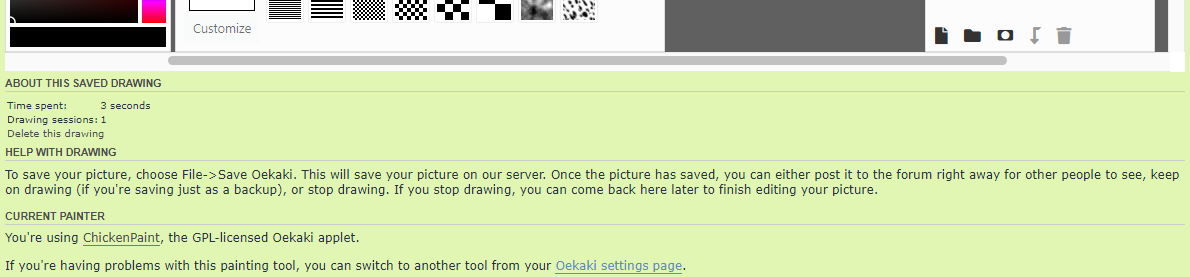
this is where you can see your time spent on an oekaki, drawing sessions (how many times you've opened that particular oekaki), and even delete your oekaki. you can also find the oekaki settings page here, if you need to change programs.
when you're done working on your oekaki, hit the save button or press ctrl s to bring up the save menu!
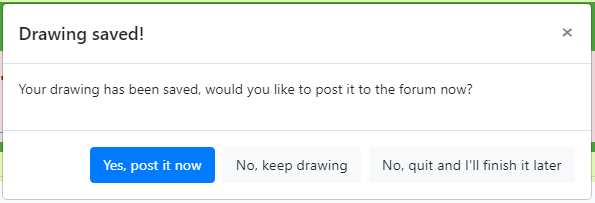
here you can... save and keep drawing, save and finish drawing later, or post now!
remember, if you choose to finish your drawing later, you can find it in the thumbnails underneath the "create a new drawing" page!
when you click post now, you'll be redirected to a new page...
here you can find your finished drawing!

if you want to save your artwork to your device and not post it, now is the best time to do so!!
just right click and save 'save image as' to save to it as is. the default file type will be a jpg!
if you want to save it as a png instead, right click the image and open it in a new tab;
from there, you'll notice the link is something like... "/image.php?id=1234&size=large&format=auto&rev=123"
you can change the "size=large" to "medium" "small" or "gallery" to save it as a different size
you can change the "format=auto" to "format=png" to save it as a png
if you want to make the background of a drawing transparent, make sure to save it as a png!
additionally, you'll have to have a clear/invisible background (it'll appear as checkers in oekaki!)
now, if you're looking to post your drawing, let's continue!!
you'll notice a drop menu, use this to choose what board to post your drawing in.
not sure what board to post your drawing in?
enter in a title and description to make your post like you'd make any other post on chickensmoothie, and you're good to go!
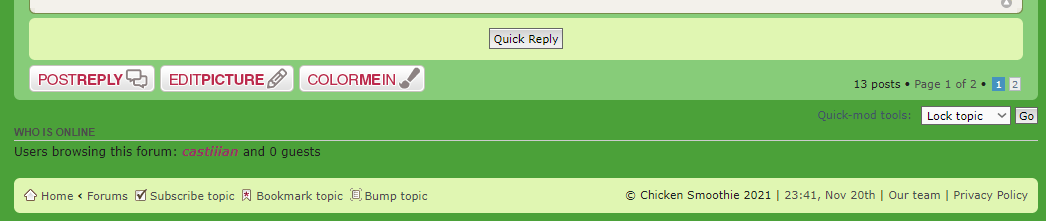
underneath your now posted drawing, you'll find a few options unique to the oekaki boards!

"post reply" is where you make replies to the post of course, but there is also "edit picture" and "color me in":
click "edit picture" to make changes to your oekaki!
click "color me in" to make a copy of your oekaki!
this copy of your oekaki will appear as a "color-in" under the parent oekaki when you post it.
read on to learn about chickenpaint v2, chickensmoothie's oekaki program!
-
castiiian - Oekaki Moderator
- Posts: 5803
- Joined: Mon Apr 11, 2011 9:52 am
- My pets
- My items
- My wishlist
- My gallery
- My scenes
- My dressups
- Trade with me
chickenpaint v2 breakdown
![]() by castiiian » Sun Nov 20, 2022 11:59 am
by castiiian » Sun Nov 20, 2022 11:59 am
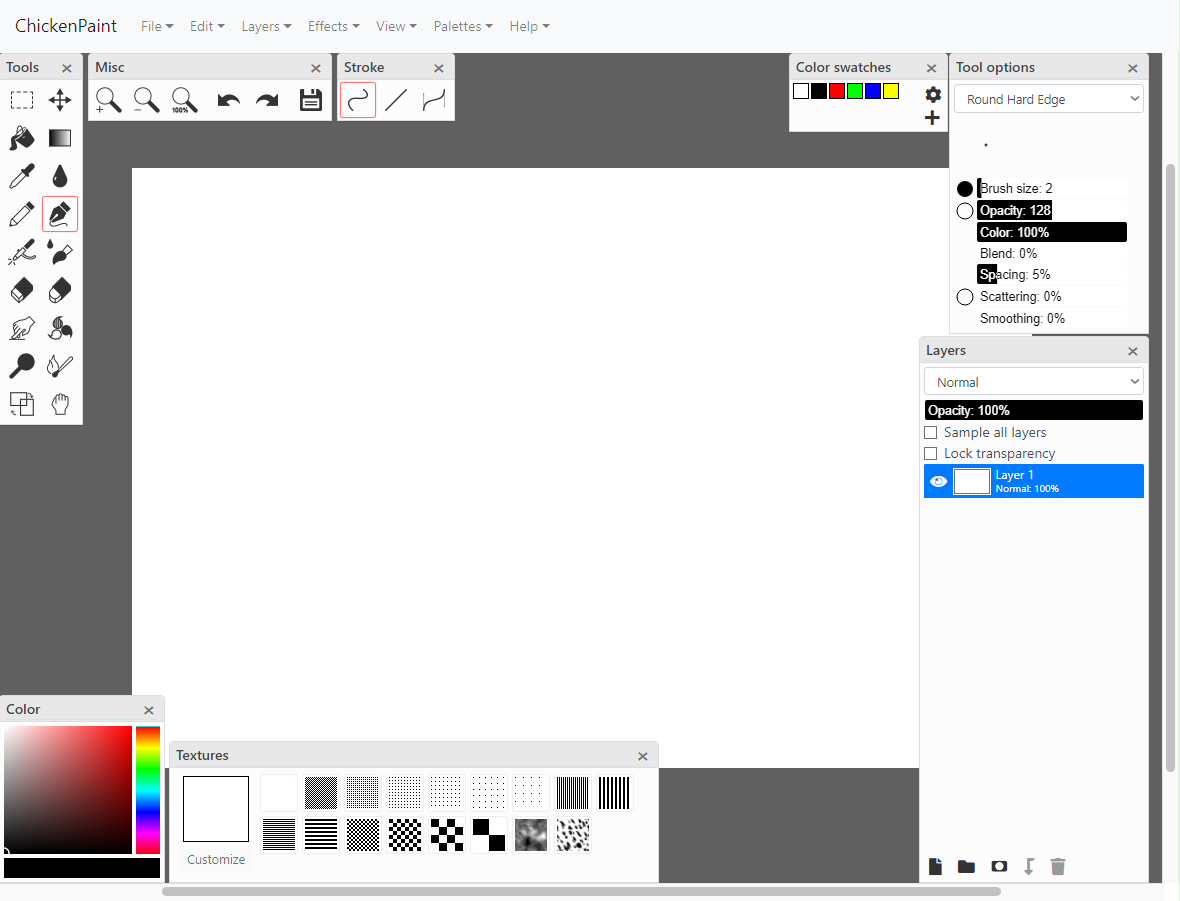
when you open up a new drawing, this is what it looks like!
you can freely drag around the panels, resize, and close them to customize your work space
oekaki will not remember your work space, each time you open a drawing, it'll return to the default arrangement!
menu

the options are...
file >
- save oekaki (shortcut: ctrl s)
- undo (shortcut: ctrl z)
redo (shortcut: ctrl shift z)
clear history (removes all saved "undos")
---
cut (shortcut: ctrl x)
copy (shortcut: ctrl c)
copy merged (shortcut: ctrl shift c)
paste (shortcut: ctrl v)
---
select all (shortcut: ctrl a)
deselect (shortcut: ctrl d)
---
transform (shortcut: ctrl y)
- duplicate (shortcut: shift ctrl d) (duplicates your layer, can duplicate groups!)
---
merge down (short cut: ctrl e) (merges the layer you're on with the one below)
merge group (merges an entire group)
merge all layers (note, this will not merge hidden layers)
---
add layer mask (adds layer mask to your layer)
- clear (shortcut: del) (deletes your layer)
fill (shortcut: ctrl f) (fills your layer)
flip horizontal (flips your layer)
flip vertical (flips your layer)
invert (inverts the colors of your layer)
---
box blur (contains the blur menu)
---
monochromatic noise (adds black and white static to the layer you're on)
color noise (adds rainbow static to the layer you're on)
- full-screen mode (click this to make oekaki full-screen!)
---
zoom in (shortcut: ctrl =)
zoom out (shortcut: ctrl -)
zoom 100% (shortcut: ctrl 0)
---
smooth-out zoomed canvas (this is a toggle, and purely visual, it does not change the quality of the posted oekaki)
---
show grid (shortcut: ctrl g)
grid options (pop up menu that allows you to change the grid's size in pixels; default is 32 pixels)
- rearrange (this moves your workspace layout back to the default)
toggle palettes (shortcut: tab) (this hides all currently open menus so only your canvas is on the screen!)
use old icons (purely visual, makes it so you can see the "old version" of the tool icons)
---
show tools (the following are all checked visible by default, click them to hide them, or press "x" on each one to hide them)
show colors
show stroke
show misc
show swatches
show textures
show tool options
show layers
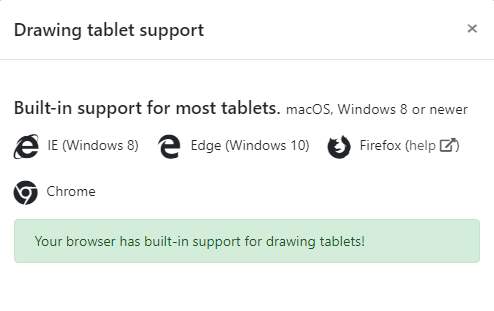
- tablet support (opens a pop up which lets you know if you have tablet support)
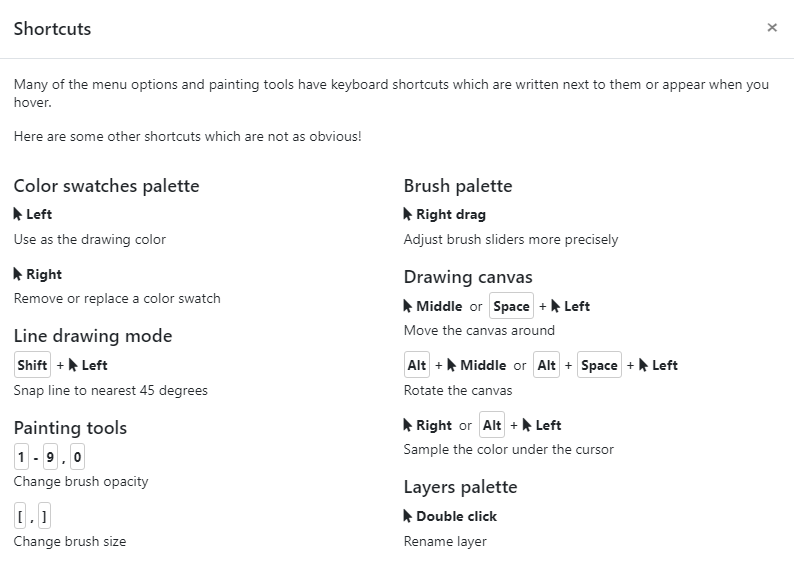
shortcuts (opens a pop up which shares some shortcuts)
---
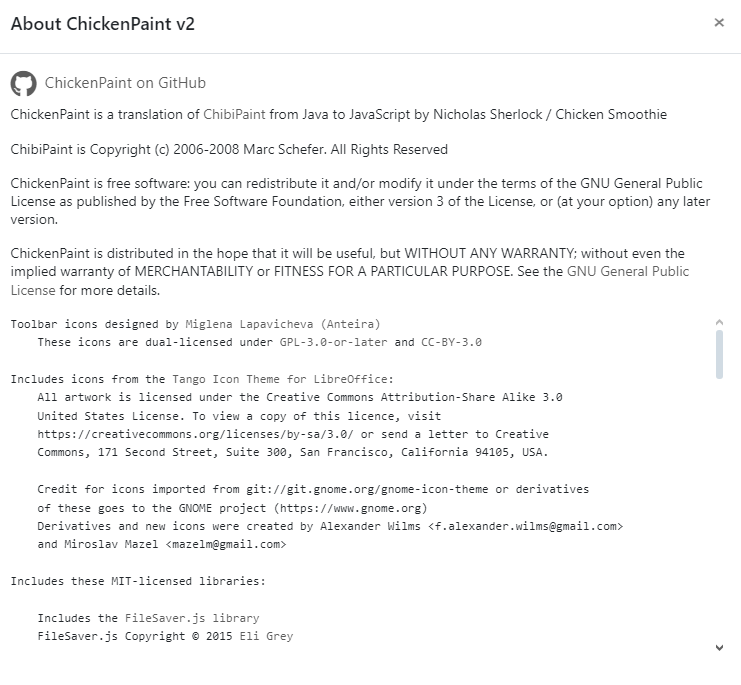
about (opens a pop up about chickenpaint v2)
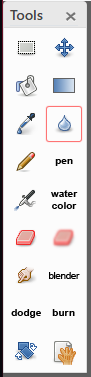
tools
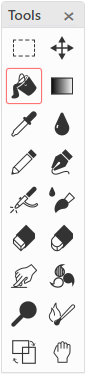
i will be explaining them left to right, so...
1. selection box
- this lets you select an area of your layer to use your edit tools on, or move around!
- click and drag to move around your layer or your selection
- click to fill in an area!
if the lines aren't pixelated, the lines of the fill will come out fuzzy
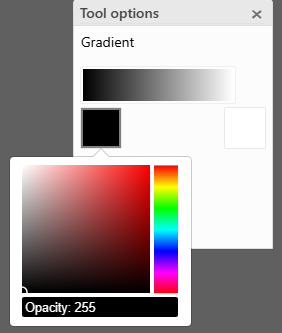
- create a gradient by clicking on your canvas and adjusting the points
use the "tool options" to adjust your gradient's colors and opacity
click the black and white boxes to change the colors, drag the opacity slider to change the opacity
- click an area to "pick up" and use that color
- similar to a "blur" tool, it lets you blur small areas with a brush
not affected by "sample all layers"
- similar to the pen tool, but better for smaller details
offers cleaner pixels, has the same "tool options" as pen
- similar to the pencil tool, has the same "tool options"
- similar to the pen/pencil tools, but with a "soft edge"
- similar to pen tool, with excellent blending capabilities
- erases whatever is on your current layer with a "hard edge"
heads up: if your layer's transparency is locked, it will instead turn whatever you're trying to erase to the color white!
- erases whatever is on your current layer with a "soft edge"
heads up: if your layer's transparency is locked, it will instead turn whatever you're trying to erase to the color white!
14. blur
15. dodge
16. burn
17. rotate canvas
- click and drag to spin your canvas around
if you want your canvas to be vertical, then just rotate it that way and hit save!
- lets you click and drag your canvas around
helpful for if you're super zoomed in, or using oekaki on your mobile device
shortcut: hold space
misc
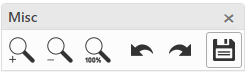
this contains a few important, commonly used oekaki options!
1. zoom in (you may also use the mouse wheel to zoom in and out!)
2. zoom out
3. zoom 100% (resets your zoom)
4. undo (undos your last brush stroke)
5. redo
6. save oekaki
stroke
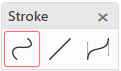
this changes how your stroke is drawn!
1. free draw
- click and drag to draw freely!
- click and drag to draw a straight line!
- create lines and curves by clicking and dragging!
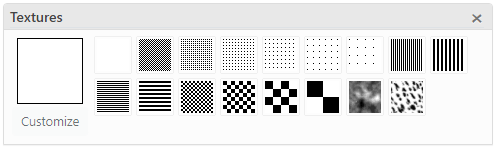
texture
color
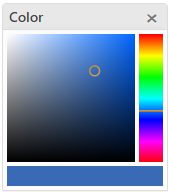
the long box at the right lets you pick your hue
the bottom box shows your currently selected color
clicking the currently selected color opens a hex code input box,
this hex code is the "color code" of your current color;
you can select a new color by typing in a new hex code.
xxx
xxx
xxx
color swatches
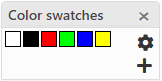
each swatch is bound to the oekaki you created it on, so you'll need to remake your color swatches whenever you make a new oekaki, or, you can save and load your swatches to your computer to use it again.
right click an existing color to access a small menu: you can remove the selected color or replace it with your current color.
press the "gear" button to save or load a saved swatch from your computer; this won't delete colors not already on your swatch, so clear your colors first if you don't want to get confused with your old colors!
press the "+" button to add your current color to the color swatch
tool options
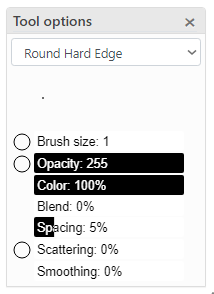
it works for all major tools: pencil, pen, watercolor, eraser, etc...
1. dropdown menu
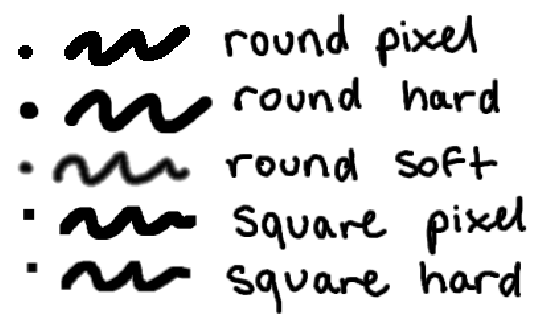
this is how you change the shape of your tool.
there are five available shapes, click here to see a comparison!
2. little dot cursor
this is actually the example of your tool size
you can directly click and drag on it to change the size of your tool
3. toggle button and brush size
this changes the size of your tool, from 1 to 200
the toggle button allows your pen pressure to alter this property
basically making it so that the harder you press, the bigger your stroke
4. toggle button and opacity
this tool changes the opacity of your tool, from 0 to 255
the less the number, the more transparent/clear the tool is
the toggle button allows your pen pressure to alter this property
basically making it so that the harder you press, the darker your stroke
5. color
this scale changes how much "color" is put down in your stroke, from 0% to 100%
the higher the number the more color is used, and the less blending occurs
a lower number is sort of like diluting your watercolors with water
if it's at 0%, it will only pick up colors already placed down
this option only effects the watercolor tool
6. blend
this changes how far "color" is dragged in your stroke, from 0% to 100%
making it 0% makes it not blend at all, or pick up other colors, while 100% makes it drag color for a while
this option only effects the watercolor tool
7. spacing
this changes how far each of your individual strokes are placed, from 0% to 100%
making the number low will give you smooth lines, while making the number high will make your strokes "spray"
this option effects "scattering" the most, it changes how far each scatter is from one another
however, if you use it with "scattering" off, you'll notice it makes a nice string of your brush shape
8. toggle button and scattering
this turns your stroke into a spray, it scales from 0% to 1000%
the higher the number the more scattered each individual stroke is, which also means a bigger area will be sprayed
having a high "spacing" will make your spray less dense, or more spaced out
the toggle button allows your pen pressure to alter this property
basically making it so that the harder you press, the more scattered your stroke will be
9. smoothing
this changes how quickly your stoke is placed down, from 0% to 100%
0% makes your stroke place down exactly as is, while a higher number will make your stroke lag behind
slowing down how fast your lines are placed makes your strokes appear more smooth
layers
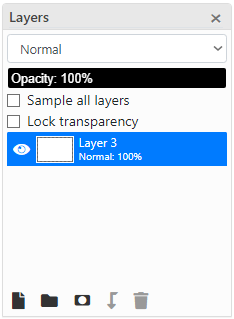
1. layer mode dropdown (click to open)
contains all the different layer modes available to pick from
you can use your arrow keys (left/right, up/down) to scroll through them quickly
2. opacity (0-100% slider)
this adjusts the transparency of the selected layer, scaling from 0% to 100%
a lower number means the layer is less visible
this is useful for adjusting sketches or making effects
3. sample all layers (check box)
this checkbox lets you "use all layers" when using certain tools
having this toggled on lets you "use" all visible layers, even if you aren't currently selecting those layers; this means you can make a brand new layer and work on it, blending and blurring without changing or damaging any of the other layers.
only watercolor, smudge, and blur tools will "use all layers", unfortunately you can't use the fill bucket or selection tools with it
4. lock transparency (check box)
this checkbox "locks" your layer
you won't be able to draw new strokes on a locked layer,
but you will be able to color over whatever already exists on the layer
5. your layers (turns into a scroll box, once you have enough layers)
click and drag your layers to change their order
click the "eye" icon at the left to make the layer invisible.
right click a layer to open a menu, this menu lets you...
rename layer
delete layer
clip to the layer below
add mask
6. icon menu at the bottom (paper, folder, window, arrow, trashcan)
paper - creates a new layer
folder - creates a folder to organize your layers, drag a layer to place it into the folder
window - makes a layer mask on the selected layer
arrow - clips the selected layer to the one below
trashcan - deletes the selected layer
-
castiiian - Oekaki Moderator
- Posts: 5803
- Joined: Mon Apr 11, 2011 9:52 am
- My pets
- My items
- My wishlist
- My gallery
- My scenes
- My dressups
- Trade with me
fundamentals
![]() by castiiian » Sun Nov 20, 2022 12:00 pm
by castiiian » Sun Nov 20, 2022 12:00 pm
- pencil vs pen
pencil is a bit "harder" than pen, meaning more pixels and less "fuzziness" around each line
experiment to find out which you prefer, and which works best for different brushes!
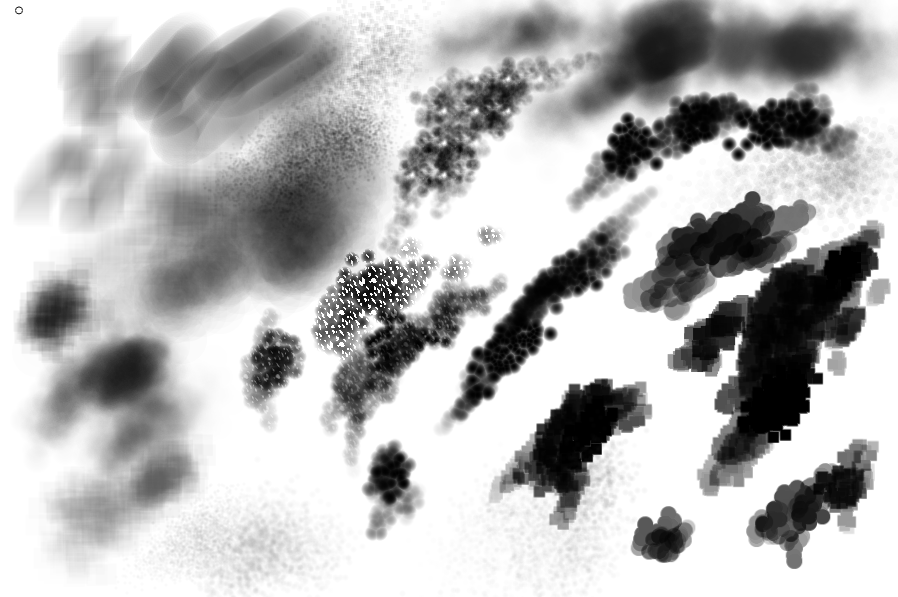
tool options
using a different combination of the available settings lets you create interesting brushes!
you can even add texture to your brush for more effect.
lock transparency ( also known as lock alpha! )
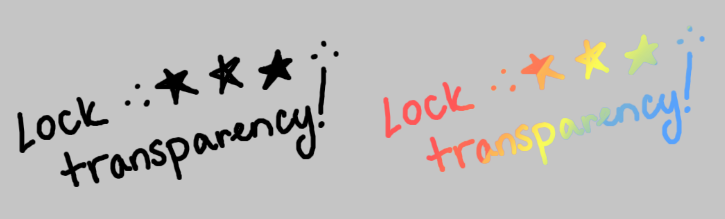
turning on lock transparency lets you color over existing colors,
this is great for recoloring lines or making a base layer and coloring it in
you can tell a layer is locked by the lock icon at the right of the layer name
clipping layers

this is sort of like having multiple lock alpha layers!
clipping a layer makes it draw only over the same area that the layer under it has
if you have multiple clipping layers a row, they will still all clip to the last layer under them that isn't clipped
you can have as many clipping layers as you want, so this is great for layering many different patterns
you can tell a layer is clipped by the arrow to the right of the layer visibility icon (the eye)
layer masks

layer masks are useful for painting in transparency!
this is used most commonly for shading or lighting
whatever is drawn on the layer will appear transparent when the layer mask is drawn on
transparency scales from white to black, with white being completely visible and black completely invisible
you can right click a layer mask to... apply it (merges it to the layer), disable it (turns its visibility off), or delete it
layer modes
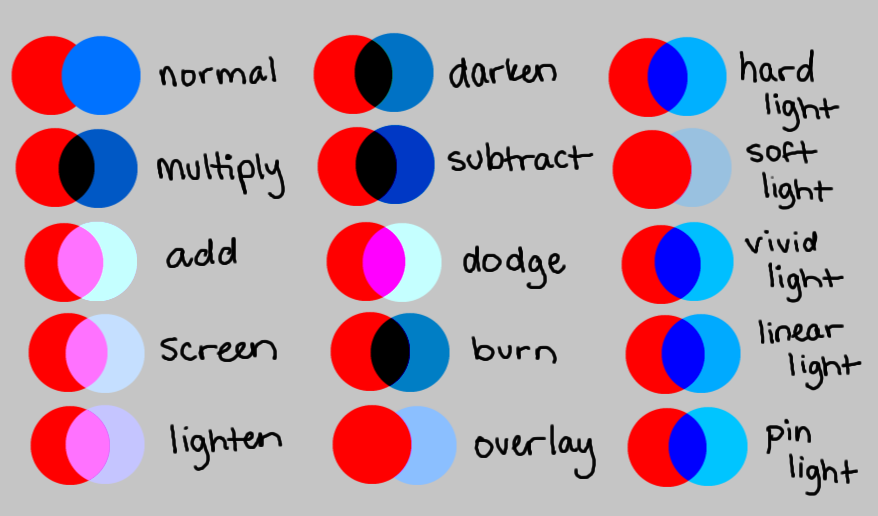
using a layer mode besides "normal" will change how that layer interacts with your artwork
this is great for creating effects, shading, highlighting, and changing the overall colors of your art
saving oekakis
just right click and save 'save image as' to save to it as is; the default file type will be a jpg
please note that jpgs have reduced image quality, so be wary of that!
to save different file types and sizes, right click your artwork and open it in a new tab;
from there, you'll notice the link is something like... "/image.php?id=1234&size=large&format=auto&rev=123"
you can change the "size=large" to "size=medium" "size=small" or "size=gallery" to view and save it as a different size!
you can change the "format=auto" to "format=png" to view and save it as a png!
pngs have higher image quality, and transparency!
if you want to make the background of a drawing transparent, make sure to save it as a png!
additionally, you'll have to have a clear/invisible background (it'll appear as checkers in oekaki)
-
castiiian - Oekaki Moderator
- Posts: 5803
- Joined: Mon Apr 11, 2011 9:52 am
- My pets
- My items
- My wishlist
- My gallery
- My scenes
- My dressups
- Trade with me
techniques
![]() by castiiian » Sun Nov 20, 2022 12:00 pm
by castiiian » Sun Nov 20, 2022 12:00 pm
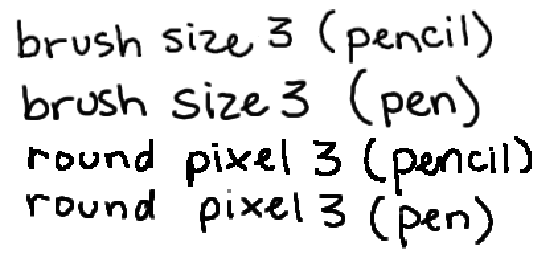
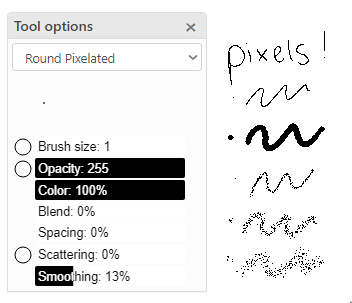
- pixel brush ( pencil )
set your shape to round pixelated, drag your opacity all the way up and put your brush size to 1 to make pixels!
remember to zoom in for more accuracy, and turn off the pen pressure toggles to keep things uniform
you can do the exact same with the eraser tool to erase your pixels
ps. you can use the fill tool with pixels without too much trouble!
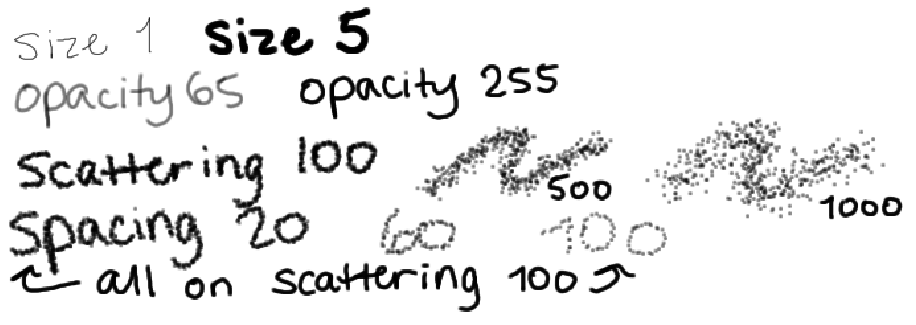
standard pixels get boring sometimes... play with your settings to make something unique and fun!
the top example is just a regular size 1, the bottom is a larger size with pen pressure,
and the other ones are just size 1 with various scattering and spacing!
these scattering ones would be great for quickly shading your pixel art...
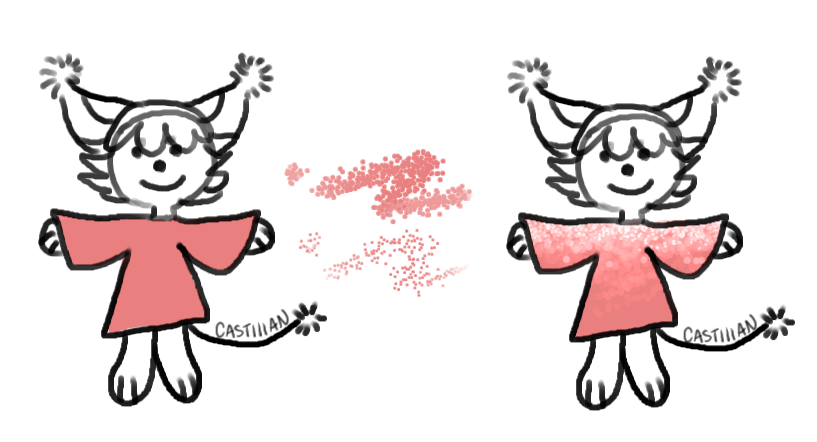
glitter brush ( pencil or pen )
using a round brush shape with heavy scattering and varied spacing and size is great for making glitter...
or leaves, petals, or whatever other texture you can think of! try using layer modes like "add" or "dodge" to really make it shine!!
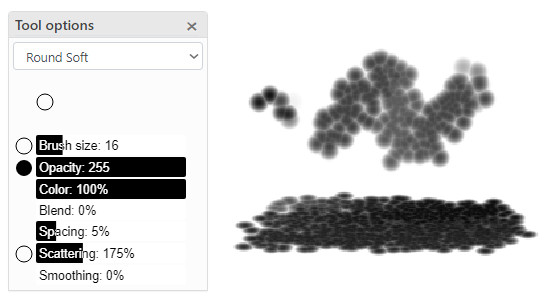
comb brush ( pencil or pen )
a round soft shape with a bit of scattering makes some unique honeycomb shapes!
this can be further changed by transforming it and and squishing it down... it sort of looks like dried mud!
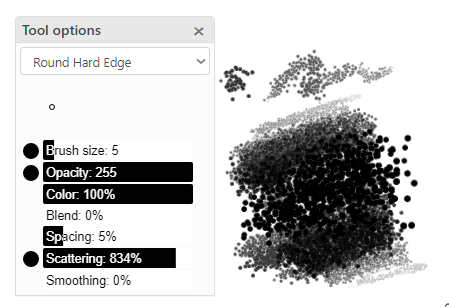
leaf brush ( pencil or pen )
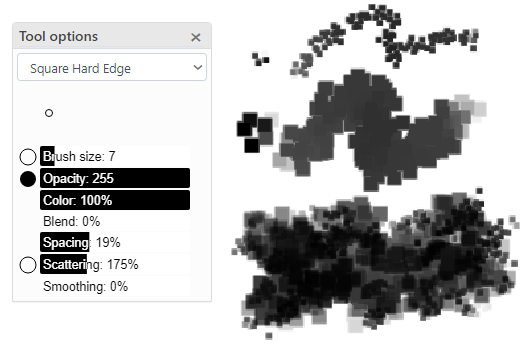
use a square hard edge with scattering and varied size to make leaves!
this is a good texture for natural objects, like rocks and dirt.
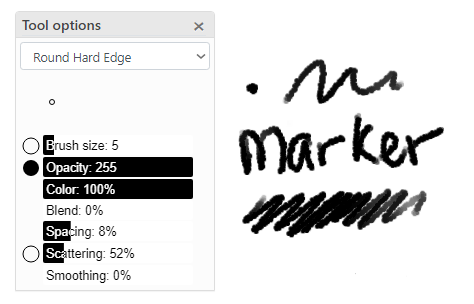
marker brush ( pencil or pen )
this simple brush is so soft and fun for unique sketches and lines.
you can even make it larger and color in with it, playing with the opacity setting to try and replicate a real life marker or watercolor! toss a layer on top of this one, fill it with noise, turning clipping on and set the layer mode to "overlay", and you can turn this brush into a crayon!
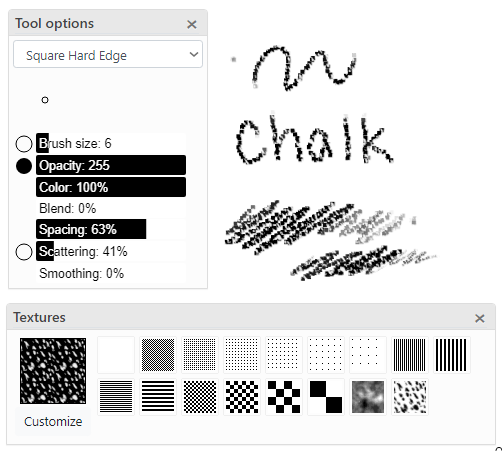
chalk brush ( pencil or pen )
a square hard edge and texture make a fun brush to imitate chalk!
try using this rough brush to make interesting sketches or color natural surfaces, like rocks and trees.
lower the spacing, and you can turn this chalk brush into something more like a rough pencil or graphite!
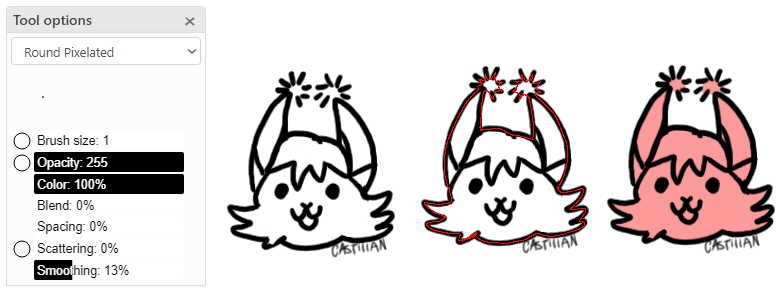
fill brush fuzzy lines be gone ( bucket tool and pencil )
want to use the bucket tool to color in your lines but hate the fuzzy area it leaves?
make a pixel brush and in a new layer outline your coloring area, and then grab the bucket and fill it in!
drag that new coloring layer down under your lines, and color away!
-
castiiian - Oekaki Moderator
- Posts: 5803
- Joined: Mon Apr 11, 2011 9:52 am
- My pets
- My items
- My wishlist
- My gallery
- My scenes
- My dressups
- Trade with me
frequently asked questions
![]() by castiiian » Sun Nov 20, 2022 12:00 pm
by castiiian » Sun Nov 20, 2022 12:00 pm
- if you have a drawing tablet, a stylus, or something similar, you'll have the ability to use pen pressure! pen pressure just means that when you touch the screen harder, the device recognizes that and makes your stroke darker/larger/etc. it's like pressing down on a pencil harder for a darker line. you cannot get pen pressure with a mouse or trackpad.
- there are four different canvas sizes on cs. creating a new drawing on any board will allow canvas sizes of 600x400 pixels (standard) or 900x600 pixels ("new larger size"). creating a canvas in the avatar or editable avatar board will allow a canvas size of 100x100 pixels (forum avatar size) or 300x300 pixels (jumbo avatar). once you've created your canvas, there is no way to change the size of it, so be sure you're using the size you want to use before you start drawing!
- oc/original character - an original, unique design for a creature (human, animal, closed species, or etc) that you own. these are often developed into "characters" and used for stories or artworks. you can create your own oc, someone else can create one for you, or you can even purchase one.
xxx - sona - it can stand for fursona, persona, or whatever else creature-sona! it might share some traits with you, like hair or freckles, or it might just match your vibes and personality. your sona doesn't have to match you exactly, it's just a character that you own that you feel represents you somehow!
xxx - closed species - closed species are usually unique, imaginary creatures that were made and developed by a user! closed species usually revolve around community. oekaki has a board just for closed species communities, click here to check it out.
xxx - uma - this stands for "user-made adoptable". this is the off-oekaki version of oekaki's closed species boards. you can find chickensmoothie's uma board here.
- animals/creatures - if the main subject of your drawing is a creature, put it here!
- anthro - if the main subject of your drawing is an anthro, put it here!
- human/humanoid - if the main subject of your drawing is a human, put it here!
- reference sheets - for character sheets (drawings that feature your character in different outfits, at different angles, with alternate colors, accessories, a color palette, etc)
- landscape/scenery - for drawings with a focus on landscape/scenery
- objects/abstract/other - for studies on objects, abstract works, and etc
- editable oekaki - if you want other users to color in your drawing, place it here (you can find bases here, which are like "coloring pages")
- colored in - this is attached to the editable oekaki board! whenever you color in something from that board, it should be placed here unless it is an adoptable or reference sheet!
- competitions - if you want users to create something for you in oekaki, this is the place to put it! ( some competition examples are "make me a species" and "design my sona". be sure to follow the oekaki competition rules!)
- entries - this is attached to the competitions board! this is where you'd place your contest entries
- artist search - if you have a species or community and want users to practice creating designs to join it as an artist, this is the place to use!
- artist search entries - this is attached to the artist search board! if you create an artist entry, it should go here
- adoptables 1: independent/one off - for adopts that are not attached to a community or closed species, you can post adopts that are "one-off" (one time) here, or u can post a series of adopts here (for example, all of ur cat adopts under one cover here!)
- adopts 1: pets - this is attached to the adopts 1 board! it's where you would put adopted out color ins or to be adopted color ins (from a collection)
- adoptables 2: closed species/communities - this is where closed species and community based adopt covers would go, as well as "nurseries" or "event" topics for those spacies
- adoptables 2: pets - attached to the adoptables 2 board, this is where you'd put color ins (individual pets) from species/communities
- comics and series - if you're creating a comic or posting a series of drawings with a similar theme, this is the place to put them!
- pages - this is attached to the comics and series board, this is where individual pages would go, as opposed to the cover being posted in the main thread
- collaborations and gift linearts - if you want to create something that only a few people can edit, place it here. you'll need to individually add everyone's names to the oekaki to allow them to color it ( this is great for species gift lines or collabs)
- collabs/gift lines colored in - this is attached to the collab/gift art board, and is where you'd place color ins of them
- editable user challenges/memes - these are where fun games go like "character for character" "art trades" "mine vs yours" "generation challenge" and other memes, users can color in anything posted here!
- challenge accepted - this is linked to the editable user challenges/memes board, this is where you'd put completed challenges/memes
- oekaki art shops - if you want to host an art shop selling oekaki art, this is where you'd put it!
- completed orders - this is attached the oekaki art shop board, this is where you'd put completed orders
- avatars - if you want to make an avatar for yourself or just use one of the special avatar sized canvases, create a drawing here! (sizes available: 100x100 pixels and 300x300 pixels)
- editable avatars - similar to editable oekaki board, except these are for a different canvas size and shrink down to show what they'll look like at cs avatar size (100x100). if you want to make icons/avatars for others to color in, this is where you'd do it!
- avatars colored in - attached to the editable avatars board, this is where you'd put avatars that you colored in
- yep! if no one has posted yet, you can delete it yourself by pressing the "x" button besides the edit button. if someone has posted, then you won't see the "x" button anymore! instead, you can report your post and ask a mod to delete it for you. if you want to delete multiple oekakis, then please send in a help ticket instead! that way you can link all the oekakis you want deleted in one single ticket, it makes it easier for both you and the mods.
- easy fix! click the "report" button by the edit button of your post, and in the report write where you'd like your topic moved! a mod will move it for you as soon as possible. if you want to move a lot of things at once, it is easier to create a help ticket and link to all the drawings you want moved!
- yes! report your oekaki or send in a help ticket, let staff know which oekaki you want moved and under which cover it should be placed. additionally, if you want to remove any linked "color-in", that's also possible (as long as you're the original artist!)
- scroll all the way down, underneath the reply buttons, on the bottom menu you'll find a button that says "bump topic".
click this to bump your topic without making a new reply! can't find it? here's what it looks like!
please remember that chickensmoothie's rules state you can only bump your thread after it's fallen off the main page!
- what is pen sensitivity or pen pressure?
how do i get a different size canvas?
what is a...
which is the correct board to post my drawing?
i want to delete my oekaki... can i do that?
i posted my oekaki in the wrong topic!
i want to change the "color-in" of my oekaki... can i do that?
how do i bump my drawing?
-
castiiian - Oekaki Moderator
- Posts: 5803
- Joined: Mon Apr 11, 2011 9:52 am
- My pets
- My items
- My wishlist
- My gallery
- My scenes
- My dressups
- Trade with me
art tutorials
![]() by castiiian » Sun Nov 20, 2022 12:02 pm
by castiiian » Sun Nov 20, 2022 12:02 pm
- click on a thumbnail to go to the oekaki!
have a tutorial for me to add to this list? post it in this thread!
last updated: 12/30/2025


feel free to post now;
ask questions, share techniques/tips, etc!
hope you all enjoy this thread! :3c
-
castiiian - Oekaki Moderator
- Posts: 5803
- Joined: Mon Apr 11, 2011 9:52 am
- My pets
- My items
- My wishlist
- My gallery
- My scenes
- My dressups
- Trade with me
Re: oekaki guide 2022
![]() by minknip » Sun Nov 20, 2022 12:03 pm
by minknip » Sun Nov 20, 2022 12:03 pm
MARKING UUGUGHGHG THANK YOU

- art by pegasi on toyhouse
hey!! im ruggie
art shop
<- thats my baby boy
im an on-and-off (now returning) player. this game is my childhood and i hope to properly make sure i can come back and get back into this game!!
im an adult trans artist (it/its), autistic and disabled
i love love lOVE splatoon and epithet erased!! my other interests can be found on my profile :>
-

minknip - Posts: 5489
- Joined: Fri Jul 15, 2016 8:08 pm
- My pets
- My items
- My wishlist
- My gallery
- My scenes
- My dressups
- Trade with me

 ||Fishy||Artist|| Adult||Sig anim by me||


-
Fishkin - Posts: 3945
- Joined: Mon May 12, 2014 5:06 am
- My pets
- My items
- My wishlist
- My gallery
- My scenes
- My dressups
- Trade with me
Re: oekaki guide 2022
![]() by Buzz Aesthetic » Sun Nov 20, 2022 12:53 pm
by Buzz Aesthetic » Sun Nov 20, 2022 12:53 pm
Heres a bunch that i'd like to suggest being mentioned! they're very nice!
Crayon-style brushes
pixelart brush (pencil round pixelated & eraser round pixelated)
Making neat borders/outlines/silhouettes by using the box blur tool once, then duplicating and merging the layer.
The brush you can get by taking the Round Soft style Pencil with ~400+% Scattering and 15+% Spacing, if you transform it flatter its great for ground texture!
clicking the color bar under the Colors Palette lets you input color-specific 6-diget codes called Hex codes
The Color Swatches Palette can be saved to your computer & uploaded into another oekaki painting! they can also be edited in Photoshops Palette Widget as well!
When coloring in your lineart, you can outline under the line layer with a pixel brush and then you'll be able to use the paintbucket tool without blurry edges!
The Gradient tool wont let you input hex codes, but you can modify the opacity of the gradient to use for cool lighting or use with a clipping layer to add a smooth gradient to linearts. (just be sure to make the second color in your gradient close in color as the first one, otherwise you'll still be able to see the original color it was!)
Alternatively you can get a smooth gradient by making a line with the airbrush tool and Transforming it HUGE!
There are two options for the transform tool, smooth and sharp- sharp is perfect for resizing pixelart!
Sample all layers for watercolors, finger, and blender.
saving an oekaki as a png, but without posting the actual image (saving it from that mid-step "POST A NEW TOPIC")
deleting images in your unfinished oekaki drawings/about this saved drawing
i love the use of the box blur tool (great for glowing or making perfect borders) and the grid (perfect checking if you're moving something along a straight line, and awesome for writing with)!! they are super helpful but i find a lot of people who forget or dont know about them! lmao
instead of the watercolor or the airbrush tool, i use the pencil tool with no brush size penpressure, yes opacity pen pressure- and i press rather lightly with many brush strokes. it can give a cool painting-style to your gradients.
I'd love to recommend linking some of Qwertyo's art tutorials!!
like these ones!
Forum/viewtopic.php?t=4700741
Forum/viewtopic.php?t=4674360
Forum/viewtopic.php?t=4226228
Forum/viewtopic.php?t=4178562
i hope this helped!! i hope i learn some new stuff from this guide too!
bees are pretty cool
xFernieFox on Sheezy.com
-
Buzz Aesthetic - Posts: 5750
- Joined: Wed Sep 18, 2019 8:56 am
- My pets
- My items
- My wishlist
- My gallery
- My scenes
- My dressups
- Trade with me
29 posts
• Page 1 of 3 • 1, 2, 3
Who is online
Users browsing this forum: B-a-b-y-B-e-a-r, ShyGhost and 0 guests