

This entry is being done by randomizer! I used a randomised list to decide the base coat, dilutions, white markings, and extra markings; the result should be up soon!
Ee
Aa
Sbsb
CrCr
Grease Spots
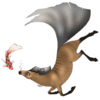
Coat Color: Perlino Sabino with Grease Spots
Genetics: Ee/Aa/CrCr/Sbsb + Grease Spots
Height: 15.2hh
Notes: Not as happy with this one - I've never tried Perlino before and with the sabino it's a bit... Mm, maybe it's just me. Not too happy with the sabino either... Gah. Will definitely be doing one more entry!
Entry 3 by AceCavalier
| Based on | Click to view |
| Artist | AceCavalier [gallery] |
| Time spent | 37 minutes |
| Drawing sessions | 3 |
| One person likes this | Log in to vote for this drawing |
4 posts
• Page 1 of 1
Entry 3
![]() by AceCavalier » Sun Dec 23, 2018 7:14 pm
by AceCavalier » Sun Dec 23, 2018 7:14 pm
Ace - She/They - Writer & Voice Actor - Australia
----------
Cavalry's Hold - Stables
Cavalry's Hoard - Adoptables

----------
Cavalry's Hold - Stables
Cavalry's Hoard - Adoptables
-

AceCavalier - Posts: 558
- Joined: Wed Aug 08, 2018 12:28 am
- My pets
- My items
- My wishlist
- My gallery
- My scenes
- My dressups
- Trade with me
Re: Entry 3
![]() by birch. » Mon Dec 31, 2018 4:18 pm
by birch. » Mon Dec 31, 2018 4:18 pm
So I'll give you a few pointers, just what has made it easier for me over my course of horse designs.
For the Perlino, just think of it as a cream you would put in your coffee or tea. It carries two cream genes so the coat will be a super soft, shimmering cream color that looks almost white yet you can see the yellow-ish tinge to it. The legs will be a soft reddish color and their muzzles are always pink. The area around the eyes (their 'eyelids' on pixel ponies) are also a soft pink like the nose.
Now with the Sabino, what I have found to be easier is to make a duplicate layer of the main color layer, get your white-ish color ready, and cover the duplicate layer on the horse. Then what I do is take the hard eraser on size 8, scatter it between 400 to 450, and make my 'basic shape'. Then I lower the size, increase the scatter, and clean up the edges to make them look like sprinkles on certain parts. After I am satisfied with the basic outcome (It will look similar to a manchado design before the next step), I take the smudge tool and go with the direction the fur would be going on a real horse. The result should look like a typical Sabino.
These are just suggestions, so don't follow them exactly. Play around with the opacity, scattering, and brush sizes to find your niche. You can look at my gallery and see it took me quite a bit to find my footing XD
Keep up the good work and show me a few more designs!
-
birch. - Posts: 3145
- Joined: Tue Mar 08, 2016 6:26 am
- My pets
- My items
- My wishlist
- My gallery
- My scenes
- My dressups
- Trade with me
Re: Entry 3
![]() by AceCavalier » Mon Dec 31, 2018 6:46 pm
by AceCavalier » Mon Dec 31, 2018 6:46 pm
Some fantastic tips - thank you!! I know I still need a lot of practice, I hope you don't mind a few trial and errors!!
I'll definitely try out that sabino technique (I've always wondered how you got yours to look so good!!) and have a go at a few different coats, too!
I really appreciate the advice!
I'll definitely try out that sabino technique (I've always wondered how you got yours to look so good!!) and have a go at a few different coats, too!
I really appreciate the advice!
Ace - She/They - Writer & Voice Actor - Australia
----------
Cavalry's Hold - Stables
Cavalry's Hoard - Adoptables
----------
Cavalry's Hold - Stables
Cavalry's Hoard - Adoptables
-
AceCavalier - Posts: 558
- Joined: Wed Aug 08, 2018 12:28 am
- My pets
- My items
- My wishlist
- My gallery
- My scenes
- My dressups
- Trade with me
Re: Entry 3
![]() by birch. » Mon Dec 31, 2018 6:50 pm
by birch. » Mon Dec 31, 2018 6:50 pm
No problem at all, I'm all for helping out new artists. I know how it feels to be the 'new kid' so I like to help out when I can 
You can always redo this babe if it makes you feel more comfortable with the design. I STILL do designs that I stare at so hard it makes my eyes hurt and I'm still not satisfied so I literally delete everything and restart from scratch XD
You can always redo this babe if it makes you feel more comfortable with the design. I STILL do designs that I stare at so hard it makes my eyes hurt and I'm still not satisfied so I literally delete everything and restart from scratch XD
-
birch. - Posts: 3145
- Joined: Tue Mar 08, 2016 6:26 am
- My pets
- My items
- My wishlist
- My gallery
- My scenes
- My dressups
- Trade with me
4 posts
• Page 1 of 1
Who is online
Users browsing this forum: No registered users and 1 guest