
So Today I'll teach you how to make a 3D effect on Pixlr Editor.
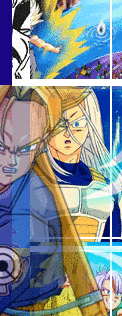
This is the finished product.

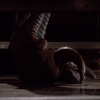
This is how it would look with the background (I chose another picture)

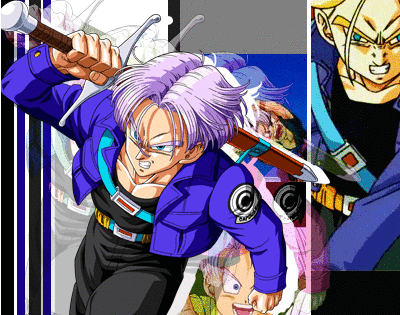
Now, first, choose your picture. If you want a transparent background pic, then use your wand tool. I'll be making mine transparent background, although it looks much better with the background. I chose the picture of Ariana Grande.
This is what my picture looks like.

1) Now, click on your image's layer. Then, go to layer and click duplicate layer. Duplicate it two times, until you have 3 layers of your image. I will name one duplicate red layer, while the I name the other layer the green layer, just so we don't get confused.

What the Layers should look like (Though Layer 1 could have a lock next to it.)

2)Now, if you look down on the previous image, you'll see a small image that looks like a note. It is beside the the garbage icon. Click that to create two, empty transparent layers. Move your layers so it would look like this.

(Let's call these two layers Layer 9 and Layer 10. I also pointed out what is the small note icon.)
3)Now, if you're looking for a 3D effect like mine, use the colors I use. I will go over and choose the color red, a slightly dark one. Using the Paint bucket tool,( ) I click on the image. I made sure that layer 9 was highlighted with blue in the layers section. (Or one of your transparent layers were highlighted)
This is how it should look like:


Now I will repeat this step with Layer 10, but with the color green instead of red. Note: The green is sorta a light blue-ish green color. This is how my layers look like.

4)Follow the image below:

Once you have click it, that will open up. Scroll down until you find screen, and click on that. Again, make sure that the transparent layer is highlighted blue. I have done this to layer 9.
This is what it shall look like: I have also moved layer 9 to the top of a duplicate so I could show you. Also, I have ticked off the box of layer 10 so the effect would be visible.

Now repeat this step for Layer 10. (Or your second transparent layer).
5) Now, make sure that your layers are in the right order. Once you have, click on a layer (red or green ones) and make sure it is highlighted blue, then go up to Layer, and click Merge down.

This will combine Layer 9 and a duplicate together. This is how it looks like; I have also repeated the step on Layer 9.

6) We're almost done! Go back to the two arrows icon ( ) and click it. Select the option ''Darken''.
(If you are doing a non transparent-background picture, skip step 7.)
7) As you can see, the background of Layer 9 and Layer 10 still contain the color after clicking Darken. Simply check off the other layer's ticks. Doing this is vital, so if you don't do it, then you're going to cut off important parts.
Here's what it should look like. (Also, a glitch happened with my checkbox, so the check for the red layer looks like it's still there, but it's not.)

Now use your Magic Wand tool so you can remove the background. If there are bits of the color left after using the magic wand tool, remove it using the Lasso tool. If you don't know how to use the Magic tool or the Lasso tool, Google it. This is what it looks like after removing the background:

I have also removed the background of the red one.
8) Last step! Now, you can move your layers around, and making it into a perfect image that looks 3D. I have moved my red to the right and green to the left.
All Done!
Thank you so much for reading this, and I hope that this has helped you.
Also, keep in mind that you can do any color, and have more than 2 layers.
Be Creative!
This is the finished product.
This is how it would look with the background (I chose another picture)
Now, first, choose your picture. If you want a transparent background pic, then use your wand tool. I'll be making mine transparent background, although it looks much better with the background. I chose the picture of Ariana Grande.
This is what my picture looks like.
1) Now, click on your image's layer. Then, go to layer and click duplicate layer. Duplicate it two times, until you have 3 layers of your image. I will name one duplicate red layer, while the I name the other layer the green layer, just so we don't get confused.
What the Layers should look like (Though Layer 1 could have a lock next to it.)
2)Now, if you look down on the previous image, you'll see a small image that looks like a note. It is beside the the garbage icon. Click that to create two, empty transparent layers. Move your layers so it would look like this.
(Let's call these two layers Layer 9 and Layer 10. I also pointed out what is the small note icon.)
3)Now, if you're looking for a 3D effect like mine, use the colors I use. I will go over and choose the color red, a slightly dark one. Using the Paint bucket tool,(
) I click on the image. I made sure that layer 9 was highlighted with blue in the layers section. (Or one of your transparent layers were highlighted) This is how it should look like:
Now I will repeat this step with Layer 10, but with the color green instead of red. Note: The green is sorta a light blue-ish green color. This is how my layers look like.
4)Follow the image below:
Once you have click it, that will open up. Scroll down until you find screen, and click on that. Again, make sure that the transparent layer is highlighted blue. I have done this to layer 9.
This is what it shall look like: I have also moved layer 9 to the top of a duplicate so I could show you. Also, I have ticked off the box of layer 10 so the effect would be visible.
Now repeat this step for Layer 10. (Or your second transparent layer).
5) Now, make sure that your layers are in the right order. Once you have, click on a layer (red or green ones) and make sure it is highlighted blue, then go up to Layer, and click Merge down.
This will combine Layer 9 and a duplicate together. This is how it looks like; I have also repeated the step on Layer 9.
6) We're almost done! Go back to the two arrows icon (
) and click it. Select the option ''Darken''.(If you are doing a non transparent-background picture, skip step 7.)
7) As you can see, the background of Layer 9 and Layer 10 still contain the color after clicking Darken. Simply check off the other layer's ticks. Doing this is vital, so if you don't do it, then you're going to cut off important parts.
Here's what it should look like. (Also, a glitch happened with my checkbox, so the check for the red layer looks like it's still there, but it's not.)
Now use your Magic Wand tool so you can remove the background. If there are bits of the color left after using the magic wand tool, remove it using the Lasso tool. If you don't know how to use the Magic tool or the Lasso tool, Google it. This is what it looks like after removing the background:
I have also removed the background of the red one.
8) Last step! Now, you can move your layers around, and making it into a perfect image that looks 3D. I have moved my red to the right and green to the left.
All Done!
Thank you so much for reading this, and I hope that this has helped you.
Also, keep in mind that you can do any color, and have more than 2 layers.
Be Creative!


