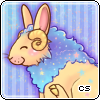
WeavingHi there! I'm going to be showing you how to
weave borders through images. For example..

Notice how the borders are behind the character? I'll be showing you how to place your borders behind, and in front of your desired image!
So step number one is to head over to
Pixlr! Pixlr is an amazing free-to-use editing program/website!
Then you'll want to scroll down a wee bit and check out
Pixlr Editor!
This little bugger should pop up!

Your going to want to create a new image!
Select your desired width and height.
I personally go for 5 for my width and 360 for my height, but it really depends on personal preference, just make sure not to go too high up on the height or it might not work well with your signature!
Make sure to also check off transparent so you don't have to do it later!
So, this is what should appear after selecting all that and putting your border into full screen.

To colour in your border, just go down to the little black looking box on the side.

Pick your colour, then move up to the paint bucket.

Then fill your border in!

Your going to then want to get out of full screen, and head back up to the "File" button near the top so you can add your desired image in.

You can copy your images url and get it onto pixlr by clicking "Open Image URL" or you can get it from your computer by clicking, "Open Image"
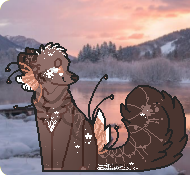
So I've got my image out, and my border, it looks like this!

I'm going to then click back onto my desired image, hover over "Image" on the top left, and increase my canvas size by width. (Make it as large as you want, your going to crop the unwanted space out after.)
I usually make my canvas around 500, just for the space, if the width is already quite large, this step is not needed.
Also, make sure the height of your border is bigger or equal to the size of your desired image, you can change the size of your desired image by going to "Image" and then changing the image size, not canvas size.
I'm then going to go back onto my border, and go up to "Edit" on the top left.
Press "Select All" then "Copy" and then "Deselect All"
You've now copied your border!
Go back and click onto your image now, go up to "Edit" and paste.

Look at that!
Now, my border isn't where I want it to be, so I'm going to go back and click this tool!

Grab ahold of your border, and move it to wherever you please!
If you'd like multiple borders, go back up to "Edit" and "Paste" your border again!
Now you must be thinking..
"How do I get my borders BEHIND the desired image, not on top of it?"
Its very simple actually!
Look to the right at your layers, over here.

Drag the layer of your desired image, ON TOP of the border.

See that? The border is now behind the image.
Do you have any access space?

Click that,and drag it over the part of the image you want to KEEP, then click, and press Ok!
Then, go up to "File" at the top left, and save your border!
Here is the finished product.

You can continue to make more borders, and colour them differently, make your own style!
I hope this tutorial worked, and you enjoyed it!
Feel free to send me any pm's if you have questions or just need some help!