

Realistic Hair Tutorial
You asked for it people person! A 9 Step Tutorial on how to make realistic hair! My little 'ol me! Enjoy!
Step 1
Select the bumpy looking texture as shown and color the area you want the hair to be. Do this in the color you want your hair do be. I used black. Label this layer something along the lines of 'Hair Base'.
**Remember to color the layer in one brush stroke. Do not un-select. It will cause the layer to be darker than you want.
Step 2
Select the blend tool and, with the same setting blend the layer up and down like I have shown here. Then shrink the size to 10 and repeat. Change the size to 6 and repeat a last time.
**You do not need to shrink and repeat but I find it makes the hair even more realistic.
Step 3
Go into the Layers Menu, select Duplicate Layer. Go into the Effects Menu, select Flip Horizontal. Go to the Layer Bar, in the Layers Window and set it to Overlay.
Step 4
Go into the Layers Menu and select Merge Down.
**You can also press the keys alt and E together to get the same effect.
Step 5
Create a new layer, use the Pencil Tool and color the color you want the hair to be. Add any streaks or color differences now. Set the layer to Overlay.Name this Layer something like 'Color'.
**If you are using black or another dark color, you should adjust the opacity so the grain of the hair is still visible.
Step 6
Create a new layer. Using the Pen Tool, draw some lines on the hair in colors lighter and darker than the base hair color. Name this layer something like "Highlights and Lowlights"
Step 7
Using the Blender Tool, blend this layer with the grain of the hair. Then set the layer to Overlay.
Step 8
Using the Dodge & Burn tools, lighten the areas you think are too dark and darken the areas you think are too light.
Step 9
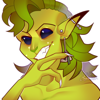
And now your done! Now go frolic with your new found hair drawing abilities!
You asked for it people person! A 9 Step Tutorial on how to make realistic hair! My little 'ol me! Enjoy!
Step 1
Select the bumpy looking texture as shown and color the area you want the hair to be. Do this in the color you want your hair do be. I used black. Label this layer something along the lines of 'Hair Base'.
**Remember to color the layer in one brush stroke. Do not un-select. It will cause the layer to be darker than you want.
Step 2
Select the blend tool and, with the same setting blend the layer up and down like I have shown here. Then shrink the size to 10 and repeat. Change the size to 6 and repeat a last time.
**You do not need to shrink and repeat but I find it makes the hair even more realistic.
Step 3
Go into the Layers Menu, select Duplicate Layer. Go into the Effects Menu, select Flip Horizontal. Go to the Layer Bar, in the Layers Window and set it to Overlay.
Step 4
Go into the Layers Menu and select Merge Down.
**You can also press the keys alt and E together to get the same effect.
Step 5
Create a new layer, use the Pencil Tool and color the color you want the hair to be. Add any streaks or color differences now. Set the layer to Overlay.Name this Layer something like 'Color'.
**If you are using black or another dark color, you should adjust the opacity so the grain of the hair is still visible.
Step 6
Create a new layer. Using the Pen Tool, draw some lines on the hair in colors lighter and darker than the base hair color. Name this layer something like "Highlights and Lowlights"
Step 7
Using the Blender Tool, blend this layer with the grain of the hair. Then set the layer to Overlay.
Step 8
Using the Dodge & Burn tools, lighten the areas you think are too dark and darken the areas you think are too light.
Step 9
And now your done! Now go frolic with your new found hair drawing abilities!
