Crow. wrote:Marking this so I can come back to this lovely thread, also real quick question, what's everyones advice for drawing human anatomy and shading in hair?
//rolls in late
I received a similar ask on tumblr (you can view the full post here) so I'll be answering this based on the answer I gave on tumblr *0*

These are just my proportions and every style generally has different proportions ( ' v ' )b I explained a few things in detail in the tumblr post
My cousin also asked me to teach her how to draw hands and I did a little demonstration for her before she gave up on me

When you draw from references for anatomy purposes, remember to break the image down into shapes and start with the shapes when you draw them. Draw lots of guides and all that stuff *0* don't feel that you have to do whatever I do in this tutorial, because these guides are the ones that help me *7* You might have different guides that you want.
For this drawing, I only needed one reference (surprisingly), but like any other drawing, I always start off with a really messy sketch to get an idea of the composition and the poses and to add my dumb little comments

then I go straight to the lineart and i draw in any guides or sketches more in detail in another layer to help me when I need it. Like in the image below, I don't usually do guides for the face or the hair too much because I don't have trouble doing those. Don't draw guides if you're not going to actually use them(?) because it might end up causing a bit of confusion with all the lines that you don't need ahaha

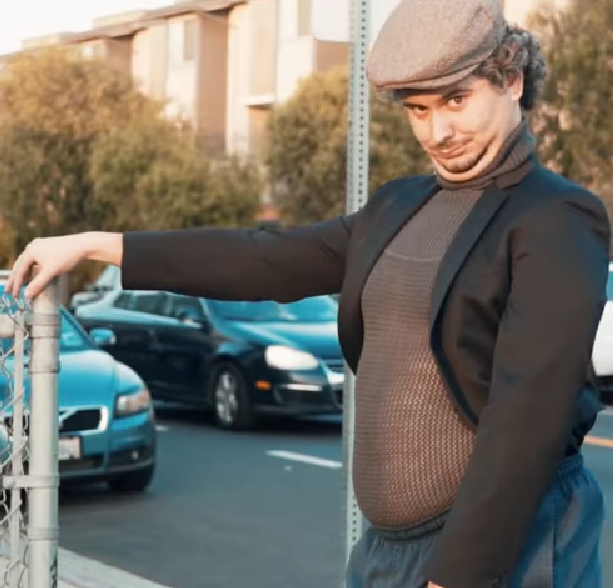
for viktor's arm, I took a picture of myself. The reference does not look exactly the same as the picture because I only needed a general idea of what the arm is supposed to look like. I don't usually draw on the reference, but this is just an example of what I see when I see a reference photo for anatomy. I also compared the height as well to the top of the head. It's a lot about observing shapes, angles and comparing one thing to another. //eventually you just kind of do it naturally

I merged the layers when I drew the picture, so you can't see the line art by itself OTL but this is what it eventually looks like. The sketch under it is also not completely aligned with the actual final drawing, but it doesn't need to be unless you really need it to be.

And after a few more minor details, you get the final product!

You can also watch the speedpaint I made here. The beginning shows how I sketched up the rough idea (originally I already sketched a quick one traditionally except messier) and how I slowly went into further detail and analysis for each person. I didn't pay as much attention to the characters in the background because... they're in the background *7* There are also a few pauses near the beginning because I kept getting up to look at the mirror because I refused to take a picture ahaha
okay now for hair shading!!

everyone has a different style for shading hair, so this is just how I shade hair;;; I usually like to airbrush around the hair with a darker colour to put more emphasis on the center part of the hair. When shading hair, you should use different hues with different values and intensities too (it just makes the picture seem more alive). For the strand things, I usually follow the direction of the line art. You also have to keep in mind where your light source is coming from, so you would shade only a part of the "strand" and leave a part without shading to show that the light hits that part more than this other part //sorry if that doesn't make sense OTL
either way, I hope this helped ;o;;; <3 I tried my best to explain OTL again, these are just my personal tips and you probably have your own ;7; so in the end, the best way to learn is to just practice and practice ( ' v ' )b learn what works best for you <3
//and sorry I explained mainly how I draw in my anime style rather than realism OTL I'll see if I have time to make one about realism too
--------------------------
@Superunknown
ahhh thank you ;o;;;; ehehe yeh lineless drawings actually take me a lot longer than my normal drawings;;; but I plan on doing more in the future ;7;;; //ahahaha I'm slowly transitioning into a less anime style, but my current style is still my favourite ;o; but I don't mind drawing in cartoony styles
and omg that dragon looks amazing *A* the species definitely sounds really cool ( ' v ' )b
@RottingJesus
looks great!! ( * 0 * )
@capone.
thank you ;7;;; ehehe some of the drawings above are my anime drawings;;; not sure if that drawing looks too similar to those ones or not, but thank you for your feedback <333 ;7;;; I will keep working on my less-anime styles <3
I received a similar ask on tumblr (you can view the full post here) so I'll be answering this based on the answer I gave on tumblr *0*
These are just my proportions and every style generally has different proportions ( ' v ' )b I explained a few things in detail in the tumblr post
My cousin also asked me to teach her how to draw hands and I did a little demonstration for her before she gave up on me
When you draw from references for anatomy purposes, remember to break the image down into shapes and start with the shapes when you draw them. Draw lots of guides and all that stuff *0* don't feel that you have to do whatever I do in this tutorial, because these guides are the ones that help me *7* You might have different guides that you want.
For this drawing, I only needed one reference (surprisingly), but like any other drawing, I always start off with a really messy sketch to get an idea of the composition and the poses and to add my dumb little comments
then I go straight to the lineart and i draw in any guides or sketches more in detail in another layer to help me when I need it. Like in the image below, I don't usually do guides for the face or the hair too much because I don't have trouble doing those. Don't draw guides if you're not going to actually use them(?) because it might end up causing a bit of confusion with all the lines that you don't need ahaha
for viktor's arm, I took a picture of myself. The reference does not look exactly the same as the picture because I only needed a general idea of what the arm is supposed to look like. I don't usually draw on the reference, but this is just an example of what I see when I see a reference photo for anatomy. I also compared the height as well to the top of the head. It's a lot about observing shapes, angles and comparing one thing to another. //eventually you just kind of do it naturally
I merged the layers when I drew the picture, so you can't see the line art by itself OTL but this is what it eventually looks like. The sketch under it is also not completely aligned with the actual final drawing, but it doesn't need to be unless you really need it to be.
And after a few more minor details, you get the final product!
You can also watch the speedpaint I made here. The beginning shows how I sketched up the rough idea (originally I already sketched a quick one traditionally except messier) and how I slowly went into further detail and analysis for each person. I didn't pay as much attention to the characters in the background because... they're in the background *7* There are also a few pauses near the beginning because I kept getting up to look at the mirror because I refused to take a picture ahaha
okay now for hair shading!!
everyone has a different style for shading hair, so this is just how I shade hair;;; I usually like to airbrush around the hair with a darker colour to put more emphasis on the center part of the hair. When shading hair, you should use different hues with different values and intensities too (it just makes the picture seem more alive). For the strand things, I usually follow the direction of the line art. You also have to keep in mind where your light source is coming from, so you would shade only a part of the "strand" and leave a part without shading to show that the light hits that part more than this other part //sorry if that doesn't make sense OTL
either way, I hope this helped ;o;;; <3 I tried my best to explain OTL again, these are just my personal tips and you probably have your own ;7; so in the end, the best way to learn is to just practice and practice ( ' v ' )b learn what works best for you <3
//and sorry I explained mainly how I draw in my anime style rather than realism OTL I'll see if I have time to make one about realism too
--------------------------
@Superunknown
ahhh thank you ;o;;;; ehehe yeh lineless drawings actually take me a lot longer than my normal drawings;;; but I plan on doing more in the future ;7;;; //ahahaha I'm slowly transitioning into a less anime style, but my current style is still my favourite ;o; but I don't mind drawing in cartoony styles
and omg that dragon looks amazing *A* the species definitely sounds really cool ( ' v ' )b
@RottingJesus
looks great!! ( * 0 * )
@capone.
thank you ;7;;; ehehe some of the drawings above are my anime drawings;;; not sure if that drawing looks too similar to those ones or not, but thank you for your feedback <333 ;7;;; I will keep working on my less-anime styles <3


.png)

.png)