


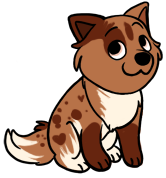
I always dread shading hair in line-less drawing because I never have a good layout of how the hair moves, but it isn't much better with lines anyway so why am I complaining?
here you can see a brief outline of how I usually do hair or fur, outline, fill, detail. shading comes later. the great thing about drawing without lines is you have a LOT of leeway for mistakes, if you make one ,you can usually make it look lots better.
now, hair's a different story, you're probably gonna ask "If this is 'selective shading' then how the heck are you gonna do the hair that way?" simple, hair and fur are the only allowances for multiple layers per part. I have a layer underneath the hair with the shading parts I need, so all I need to do is edit the hair's layer setting after I shade it.
shading with multiple layers works the same way here as it does with lined shading if you have more than one layer, it's all in where the light's coming from and what kind of light.
if the light's right in from of them, like a light-bulb or a flashlight, or during the day, you'd use either the Multiply setting or the Soft light setting.
if it's darker. like a sunset, or there's a flame or torch light, then its safest to use the Subtract setting, it's stronger than multiply and adds much needed definition to your work. if you're not sure what to do for the shading or even how to keep it in the same area, that's simple too. select the area around what you want shaded(your whole drawing for instance) copy and paste. now you have a second layer to work with. lock the alpha, erase and you can get started. simple.
for the next part, I'll show you the steps I take to shading fur and such for line-less, as well as give a start on the foreground effects.
hope you like it
Forum rules
Reminder: Copying another person's art without permission to reproduce their work is a form of art-theft!
Click here to see the full Art Rules!
Need help using the Oekaki? Check out this Guide to the Oekaki!
Reminder: Copying another person's art without permission to reproduce their work is a form of art-theft!
Click here to see the full Art Rules!
Need help using the Oekaki? Check out this Guide to the Oekaki!
Drawing without lines, step four by troblsomtwins829
| Based on | Click to view |
| Artist | troblsomtwins829 [gallery] |
| Time spent | 32 minutes |
| Drawing sessions | 1 |
| 2 people like this | Log in to vote for this drawing |
1 post
• Page 1 of 1
Drawing without lines, step four
![]() by troblsomtwins829 » Wed Jan 23, 2013 9:34 am
by troblsomtwins829 » Wed Jan 23, 2013 9:34 am
I am no longer on Chicken Smoothie. I'll probably log in now and then to keep up with my account maintenance, but I won't be around much
\)O3O)\) ¡¡OOM ¡uʍop-ǝpısdn ,uıɔuɐp ɯ,I 'ǝɯ ǝıʞooן ˙˙˙ʎǝH (/(OƐO(/

Featured artist: Shadeypaws :D thank you!

Current Me,
Eating: whatever
Drinking: Tea
Reading: Comics on ComicFury
Listening to: Instrumentals
Watching: Livestreams
Playing: Nothing
Mood:
Eating: whatever
Drinking: Tea
Reading: Comics on ComicFury
Listening to: Instrumentals
Watching: Livestreams
Playing: Nothing
Mood:
Driving myself crazy

-

troblsomtwins829 - Posts: 6826
- Joined: Fri Sep 02, 2011 11:01 am
- My pets
- My items
- My wishlist
- My gallery
- My scenes
- My dressups
- Trade with me
1 post
• Page 1 of 1
Who is online
Users browsing this forum: Gelée Nova and 0 guests