

Part two of this look into my Oekaki lineart creation process! This is not about how to draw horses or anything this is just the settings/layers/technique I use to get my linearts the way they are. Part 1 was about the lining itself, part 2 is about shading/highlights.
1. After doing all the steps in part 1, I lock my color layer.
2. I make a new layer above the color layer, clipped to it (downward facing arrow on the layer window). I fill this entirely with my shading color and set it to multiply.
3. I block out my general shading with the soft eraser, standard settings with a big brush. I'm just getting an idea of where my light is coming from and general body shaping.
4. I go back in with a combination of the soft eraser, now a small brush, and the airbrush tool and do all my fine detailing and exact shading. I also come in with the hard eraser and pen tool for harsh shadows or very detailed spots. Mostly I am using the soft eraser, though, erasing out where light is hitting. Once I'm done with this layer I usually reduce opacity a ways, whatever seems right and won't look too harsh on light colors.
5. Another new layer clipped to the color layer, set to overlay. I use the airbrush tool and add general highlights with white, then go back and refine with the soft eraser, smaller airbrush, hard eraser, and pen tool. Lower opacity. Also here I added a layer above everything (including the lines, w/ no clipping) and add my "shinies" such as eye shine dots.
6. This is a personal preference but usually I color the lines with a color similar to the shading color and set the layer to multiply, leaving the eyes and lip line dark (again, personal preference). I may even go in and fade out some of the lines with the soft eraser (with the layer locked, though, so no opacity is actually lost, it just turns white and can't be seen as much on multiply setting).
Annnnd that's it! Lines are ready to color. Basically for my shading I use a negative approach where I am taking away rather than adding. Though once I'm in the fine detailing stage there is a lot of back and forth. The soft eraser is my best friend when doing soft shading like this, when it is small it does great for getting soft but precise details and when it is large it is great for the soft blocking to give very smooth shading IMO.
Forum rules
Reminder: Copying another person's art without permission to reproduce their work is a form of art-theft!
Click here to see the full Art Rules!
Need help using the Oekaki? Check out this Guide to the Oekaki!
Reminder: Copying another person's art without permission to reproduce their work is a form of art-theft!
Click here to see the full Art Rules!
Need help using the Oekaki? Check out this Guide to the Oekaki!
Ember's Oekaki Lines Process & Tips - part 2, shading by EmberWolf
| Based on | Click to view |
| Artist | EmberWolf [gallery] |
| Time spent | 15 minutes |
| Drawing sessions | 1 |
| 39 people like this | Log in to vote for this drawing |
3 posts
• Page 1 of 1
Ember's Oekaki Lines Process & Tips - part 2, shading
![]() by EmberWolf » Mon Feb 17, 2025 11:11 pm
by EmberWolf » Mon Feb 17, 2025 11:11 pm
Last edited by EmberWolf on Mon Feb 17, 2025 11:25 pm, edited 1 time in total.
-
EmberWolf - Posts: 10973
- Joined: Sun Nov 23, 2008 5:20 pm
- My pets
- My items
- My wishlist
- My gallery
- My scenes
- My dressups
- Trade with me
Re: Ember's Oekaki Lines Process & Tips - part 2, shading
![]() by EmberWolf » Mon Feb 17, 2025 11:24 pm
by EmberWolf » Mon Feb 17, 2025 11:24 pm
Cont. -
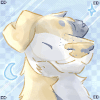
This is the isolated shading and highlight layers from this drawing, I think it gives a decent idea of the process I use without lines in the way. I made a big blotchy shading layer and then "carved" out the light parts. There are big areas with soft shading using the soft eraser and airbrush, then there are small areas with harsh lines using the hard eraser and pen (muzzle and eye is a good example), and various softness/preciseness in between, such as on muscling.

Anyways, hope this helps for anyone curious c:
This is the isolated shading and highlight layers from this drawing, I think it gives a decent idea of the process I use without lines in the way. I made a big blotchy shading layer and then "carved" out the light parts. There are big areas with soft shading using the soft eraser and airbrush, then there are small areas with harsh lines using the hard eraser and pen (muzzle and eye is a good example), and various softness/preciseness in between, such as on muscling.
Anyways, hope this helps for anyone curious c:

♥ G.B. ♥
"hi, i'm G.B., one of Ember's real life cats.
just so you know, Ember is always looking for
missed monthlies on her wishlist.
feel free to shoot her a trade!

♥ Rosie ♥
"hey, i'm Ember's other cat, Rosie.
if you're wondering, Ember's PM's are always
open if you have other questions or
just want to chat. she does not
take commissions anymore."

-
EmberWolf - Posts: 10973
- Joined: Sun Nov 23, 2008 5:20 pm
- My pets
- My items
- My wishlist
- My gallery
- My scenes
- My dressups
- Trade with me
Re: Ember's Oekaki Lines Process & Tips - part 2, shading
![]() by COOLDOGOOO » Tue Feb 18, 2025 7:10 pm
by COOLDOGOOO » Tue Feb 18, 2025 7:10 pm
ohh this is actually super helpful, ty ember!!


——————————————>
currently in need of USD;
pwyw art shop is linked on
the right!! (clicky) ordering
would help me out a ton <33
————————————————
hi! i go by any pronouns and
any nicknames :3 you might
see me lurking around the
oekaki boards and species;
im an artist for moodles!!
-
COOLDOGOOO - Posts: 7212
- Joined: Thu Feb 24, 2022 7:50 am
- My pets
- My items
- My wishlist
- My gallery
- My scenes
- My dressups
- Trade with me
3 posts
• Page 1 of 1
Who is online
Users browsing this forum: No registered users and 26 guests