nayeonbunny wrote:hi, does anyone know where I can find anything like this?

thanks in advance!
Those images are called dingbats. Most font sites have a category dedicated to them. You will most likely find tons of these here:
http://www.dafont.com/mtheme.php?id=7winded wrote:Hello~
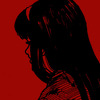
please tell me if this is the wrong place to post this!I need help making the background of
this gif transparent.
I've been tackling it for hours, so help anytime soon would be appreciated! Thank you!
To do this is a frame by frame job. You would have to go through and manually erase each background off each frame. It would take anyone else hours to do this as well.
There is a post I did about this here:
viewtopic.php?f=23&t=2167035&p=92158477&hilit=remove+background#p92158477Quoting this here:
Unfortunately you can't magically just wave a wand and do it a lot of the time and in this case, this gif's overall temporal hue and saturation will pretty much disable the whole quick select as it would sense the hues too much since they are the same/similar tones. (Change the image to black and white to see what I mean)
With this gif in particular, you would probably be better off going around the edges of the eraser tool for a smooth clean finish. I've manage to do this a few times before and unfortunately this is extremely time consuming overall, though at the same time it tends to turn out more effective than using quick selection due to it's tinkering delicacies, especially in CS6 where sometimes the quick selection and smart tools are temperamental with their tone selections. (There are approx 256 different coloured tones in monochromatic shade colour palette [black, greys, grays, white]) and so when you put your quick selector to 60, it means it selects 60 grey toned colours.
It is also worth mentioning that I find using mouse to go around the edges in eraser a lot more effective than using tablet, and it is possible to do it with mouse. c:
How I do this is the following:
- Do a outline around the figures you wish to keep in about size 2-4 px eraser with 0% hardness.
- Once done this, then go around with the polygon selection lasso tool and click around where you previously erased, make it into shapes.
- Delete that selection.
This works out, for the gif in question, you can use this method pretty much on any gif support editing software. (Esp photoshop)
Of course, this is not the only way to do this, but depending on what program you have, this is probably a really effective method.
For this gif, I think without analyzing it properly it looks to be about 20 or so frames, so you might be able to do it in 40 mins- 2 hours?
Onelast thing to add is that with this method, if you cut into the image you are erasing out (aka accidentally erase a part you didn't intend to) you can duplicate a layer and thicken the line with this. Of course if you remove it, you can reverse, but it helps with getting pixel perfection 8)
I really hope this is explained properly, I think I confused myself here a few times. Need any elaboration, please feel free to ask c:
There is also this post
here which explains the 'ficcle' likeness associated with transparent images which you may or may not know about.


