

Original Lineart
Sadly I think that is the best wing I've ever drawn. Next time I should really look up a refrence. It looks completely out of place and like it's attached to the back of her neck. I redid it several times and eventually left it.
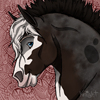
On a happier note I love the two feathers closest to the bottom fo the picture, I think they look really good.
I'm not sure if I'm happy with the shading either. I think the highlights are a bit to harsh (and occasionally out of place) and the shading doesn't show up at all.
As you can see I started drawing grass adn got bored...so yeah, I've gotten spoiled by GIMP and the new grass brush I downloaded. I actaully like the group of grass in the bottom right corner though.
The blue is supposed to be a puddle and the fuzzy black diagonal lines are supposed to be rain.
Comments, Critiques, and any art tips are welcome.
For Kittyneigh by emgeal
| Based on | Click to view |
| Artist | emgeal [gallery] |
| Time spent | 2 hours, 56 minutes |
| Drawing sessions | 2 |
| Log in to vote for this drawing | |
4 posts
• Page 1 of 1
For Kittyneigh
![]() by emgeal » Sun Oct 11, 2009 3:54 am
by emgeal » Sun Oct 11, 2009 3:54 am


Complete Collection Achieved on 12/21/2011! (Pets and items)
-

emgeal - Posts: 1947
- Joined: Tue Sep 16, 2008 9:12 am
- My pets
- My items
- My wishlist
- My gallery
- My scenes
- My dressups
- Trade with me


-
kittyniegh - Posts: 823
- Joined: Tue Jan 06, 2009 9:17 am
- My pets
- My items
- My wishlist
- My gallery
- My scenes
- My dressups
- Trade with me
Re: For Kittyneigh
![]() by Squeeing_Onion » Sun Oct 11, 2009 6:38 am
by Squeeing_Onion » Sun Oct 11, 2009 6:38 am
I like how you did the wings, they look good!
Also, how are you getting the same horse in there twice, and flipping it?
Also, how are you getting the same horse in there twice, and flipping it?

“If a black cat crosses your path, it signifies that the animal is going somewhere.”
― Groucho Marx
~* I accept Art Requests for WL pets, Dreamies, and CS$ *~
Formerly known as *Fire_Heart*
-

Squeeing_Onion - Posts: 844
- Joined: Thu Aug 27, 2009 7:11 am
- My pets
- My items
- My wishlist
- My gallery
- My scenes
- My dressups
- Trade with me
Re: For Kittyneigh
![]() by emgeal » Sun Oct 11, 2009 7:17 am
by emgeal » Sun Oct 11, 2009 7:17 am
@kittyniegh: I'm glad you like it. 
@fire_heart: I'm probably going to make a tutorial about this (a lot of people have been asking).
First of all I'm going to assume you understand layers if you (or anyone else reading this) does not understand please feel free to message me.
Step 1:
Select the layer containing the lineart (the selected layer is blue in the layers pallette). To double check you have the correct layer click the black dot to the left of the name. This should make the lineart disappear. If there is shading as well you need to "merge" the lineart onto the shading. If you do not you will have one creature that is shaded and one that is not which looks odd. To merge you go to the top bar select layers and click "merge down". NOTE: Make sure you have the upper layer selected, otherwise you may merge your lines to the background.
Step 2.
Duplicate the layer TWICE by going to the top bar, clicking effects, and selecting "Flip Horizontally". (You can flip it vertically as well, it just doesn't work quite as often). Hide one of the layers for now.
Step 3.
Set both layers to multiply. To do this go to the layers pallette and click on the arrow by the word "Normal". There should be a long list. Select Multiply (near the top). Now you should see both of your linearts overlapping and the background behind them (if it is a checkerboard I would suggest putting a white background. When I color I use bright red, but it's up to you).
Step 4.
Move the lines to where you want them. To do this use the move tool (looks like a compass rose) and move the lineart a bit at a time. Please note: If you move the lineart off of the screen and let go then that part of the lines will disapper. You can use the CTRL+Z keyboard shortcut or the top bar, edit, undo if you accidently delete part of the image.
Step 5.
Decide which one you want in front. Use the eraser tool to remove the other lines. This can be confusing, (For example look at all those legs!), but you can hide/unhide them to check and make sure you are doing it right.
Step 6.
Remember the layer we hid? That was so that you wouldn't accidentally delete the artist's signature. Go ahead and hide the other two lines, show the signature and erase the creature from it. Set that layer to multiply.
Step 7.
Show all the layers, you should have two critters and the artist's signature. Add your own signature to the signature layer, make a new layer below all of the lines layers, and start coloring!
Please feel free to PM me with any questions or clarifications.
Complete Collection Achieved on 12/21/2011! (Pets and items)
-
emgeal - Posts: 1947
- Joined: Tue Sep 16, 2008 9:12 am
- My pets
- My items
- My wishlist
- My gallery
- My scenes
- My dressups
- Trade with me
4 posts
• Page 1 of 1
Who is online
Users browsing this forum: No registered users and 26 guests