So as you may have seen I have been utterly addicted to dapple gray horses lately. I find them super fun although a little tricky to get right. A lot of people just use lighter dots scattered around the horse as dapples and I'm here to tell you that that is not the most optimal way to get realistic dapples. I used to do the same but have come to find a better way, and this is it!
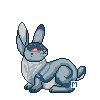
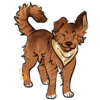
The two horses on the bottom are to compare what the dot dapple method looks like compared to my "scale & star" method. Of course my way is one of many ways you could get similar results so mess around with it and see what works for you!
This does take some more time than dot dapples, of course, but I find it totally worth it. Alright, let's begin with in-depth step describing!
Step 0
Before the dapples, of course, I lay out my basic grays on the horse. Horses gray in stages and always end up completely white. However! They usually gray in specific areas faster than others. I'll go over this more in depth in the next part! But for this horse in particular, I laid out a gray base color, which has a slight warm tone to it as most graying horses would unless they are graying from a true black or other non-red color. The background color is the same as my base color. Then I lay my lighter areas - the flanks and belly, the head and fading down the neck. After that I lay in the darker gray on the hindquarters, joints, withers, and muzzle. Aaand that's about it! Nothing too difficult, just a large size airbrush tool.
Step 1
First step shown on the image - the base of the dapples. I take a darker gray than my base and make "scales." These are usually kind of hexagon or rectangle in shape but honestly can be anything as long as they are still sort of that in general. Basically, I am doing the OPPOSITE of dot dapples. I'm not making a light mark, I'm making the dark space around where I want light spots to be. To do this I take a smaller (usually 10px) airbrush tool and just brush them in that way. Trying not to be too dark here. In areas where the body is lightest I have them "taper off" in a way, by not making complete shapes and fading them. You can also just go over the edge of the dappled area with the light color to fade them. Where areas are darker, the dapples should be more crisp. I do this in every area I feel should have dapples, which isn't EVERY area on the horse. For example, the hindquarters are usually slow to gray out and don't have many dapples yet. The neck is generally light and doesn't need any darker dapple outlines. Legs gray out in patterns differently than dapples (see the veiny lines). Heads usually gray out first and are completely white by the time most horses reach this stage of graying. After you've dappled every proper area, onto step 2!
Step 2
Now we're going to take a slightly darker gray and go back over our dapples. Starting from places where there is dark gray - like the withers - go back over the lines of your dapples and darken them, then slowly work outwards while fading as you go so the dapples 'fade,' too. This is also a good time to make your dapples more fuzzy and natural looking, less scaley. So use a slightly bigger airbrush and blur them out a little bit with slightly jagged, soft edges. As you get closer to your light areas like the flanks and neck, don't further outline your dapples, leave those ones light.
Step 3
This is partially optional depending on the type of gray you are going for, but this is where the 'stars' comes in. Taking your lightest gray - the head color - make small crosses within your dapples. The shapes of the crosses can vary a lot and it's good to make them all different, not just stick straight. Using the airbrush again (honestly the only tool I use to color horses unless I'm doing markings), in a smaller size, brush these in EVERY dapple. I know, time consuming, but worth it for the effect! Some crosses can be bigger than others, thicker or thinner, big or small, but shouldn't cover up your underneath dapples too much. Places like the neck and hindquarters, which got little to no dapple outlines, can get these in places you didn't put dapples. References are really handy here! But every horse grays out slightly differently, so experiment and research a little. The veiny lines on the legs can also be put in now.
After that, I usually go over everything very lightly with low opacity airbrush in my base grays to fade it all out and bring it all together again. So the lightest grays over the lightest gray areas to soften the dapples there a bit, darkest grays in the dark areas to soften those and make sure they didn't get too bright, etc. And you're done!
Tips & Tricks
-Try not to make your dapples too big or too small. Sizes can vary a lot, but you don't want huge spots or very little scale-texture looking ones.
-Try to vary your shapes a lot and avoid perfect circles. Horses are covered in hair, they aren't smooth, so there should be a slight fuzzy appearance and dapples usually are in more hexagon or rectangle shapes - look up references for this. They aren't round!
-Make sure all your dapples are connected!! This is very important. You won't have a stray dapple outline out in the middle of no where. I work from the withers out usually, and make sure everything is connected.
-Add some color to your gray! I would not recommend keeping your gray color right on the edge of the color selector. Make it warmer with some reddish orange hues or more blue.
-Any horse can have dapples, no matter the color. Horses that are very healthy often have dapples that just naturally appear in their fur. They are usually shown by a light sheen but work in the same shapes, generally only appearing on the belly and hindquarters. Of course, these are very VERY faded dapples and not nearly as bright as on a horse that is graying out. Unhealthy horses of other colors will not have dapples.
-References, again!
_____________________
>>Part two>>